Recycling yarn from a sweater is a great way to get a lot of yarn (sometimes very high quality yarn) for an affordable price. Goodwill (a.k.a. G.W. Fashions) and Salvation Army are great places to search for "yarn on the hanger", especially if you can find a sweater in a very large size that's made from good yarn.
Before you go to the work of disassembling your sweater, however, a couple of considerations should be taken.
* Firstly, is it worth the effort? Acrylic yarn is so affordable, I don't see the advantages of recycling an acrylic sweater unless the color is especially appealing (as acrylic cannot be dyed another color). Always check the tag in the sweater to see what the sweater is made from. Cotton, mohair blends, and especially cashmere are usually good fibers to start with. Remember that natural fibers (animal and vegetable) can be re-dyed, so just because you don't like the color of a yarn doesn't necessarily mean it's worthless.
* Secondly, what weight of yarn will you have once the sweater is taken apart? The thicker and more tightly wound the yarn, the easier it will be to disassemble. A sweater made from thin yarn (fingering or especially lace weights) is extremely difficult to take apart, and in my opinion, shouldn't be bothered with unless the yarn itself makes it worth the effort to you.

* Finally, is it even possible to take the sweater apart? If the sweater has serged seams, don't even attempt to use the yarn, as it will have a break every time it gets to the edge of the garment, and you will have lots, and lots of knots to make to create one long seamless bit of yarn. (Serged seam)
 (Serged seam)
Okay, once you've decided to demolish your sweater, let's get started! Start by finding the side seams of the body or arms, which will be on the inside (obviously) of the sweater.
Spread that seam in half along the length, and you'll see a tiny bit of stitch that is holding the two parts of the sweater together. It's easier to see if the garment is sewn together with thread, but sometimes it's sewn together with the exact same yarn as the garment, making it more difficult to tell which is the stitching yarn and which is the fabric yarn.
Use a razor blade to gently run the length of the seam, being very careful not to cut the yarn that makes up the fabric of the garment. You can, of course, use a seam ripper, but in my opinion it is more unwieldy and takes much, much longer. Scissors are also an option, but I'd stick with scissors that are extremely sharp and very small, as most regular sized scissors are too large to be useful.
After several cups of coffee, much patience, and a few dulled razor blades, you should have several pieces resembling this, the front, back, and arms of the sweater.
Most commercial sweaters are knitted from the bottom up, so I'd suggest trying to start unwinding the thread from the top first. A knitter can usually distinguish which direction the stitches are going, but if you can't tell, just try from the top first. Cut across the top layer, trying to cut the same row.
Begin unraveling the yarn. This may take a few attempts, as little half-cut bits of yarn might need to be pulled out. Once you get a clear row of "live" stitches, you can begin winding the yarn into a ball.

Spread that seam in half along the length, and you'll see a tiny bit of stitch that is holding the two parts of the sweater together. It's easier to see if the garment is sewn together with thread, but sometimes it's sewn together with the exact same yarn as the garment, making it more difficult to tell which is the stitching yarn and which is the fabric yarn.

Use a razor blade to gently run the length of the seam, being very careful not to cut the yarn that makes up the fabric of the garment. You can, of course, use a seam ripper, but in my opinion it is more unwieldy and takes much, much longer. Scissors are also an option, but I'd stick with scissors that are extremely sharp and very small, as most regular sized scissors are too large to be useful.

After several cups of coffee, much patience, and a few dulled razor blades, you should have several pieces resembling this, the front, back, and arms of the sweater.

Most commercial sweaters are knitted from the bottom up, so I'd suggest trying to start unwinding the thread from the top first. A knitter can usually distinguish which direction the stitches are going, but if you can't tell, just try from the top first. Cut across the top layer, trying to cut the same row.

Begin unraveling the yarn. This may take a few attempts, as little half-cut bits of yarn might need to be pulled out. Once you get a clear row of "live" stitches, you can begin winding the yarn into a ball.

Sometimes you will have a break in the yarn, and you'll need to knot the two ends together. You can either make a regular knot and deal with it later, or you can twist the two ends together to make an almost invisible join (click here to see my tutorial for that). (As you can see, I didn't follow my own advice and used a 100% acrylic sweater. )
 (As you can see, I didn't follow my own advice and used a 100% acrylic sweater. )
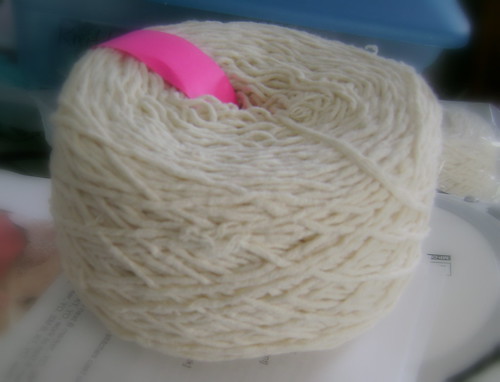
Now, here's a couple of tips that make it easier to use your yarn for future projects. First, figure out how many yards of yarn you have. To do this, measure out about 20 yards of yarn and weigh it on a sensitive scale by grams (a kitchen scale works nicely for this. You can also go to the post office and ask them to weigh it for you if you are especially charming and have no shame.) Then, do a bit of math. For instance, if 20 yards of yarn equals 15 grams, then I can deduce that every gram of yarn is 1.33 yards (yards divided by grams). Then, measure the entire ball of yarn, and if it's, say, approximately 115 grams of weight, you will know that there are about 153 yards of yarn in that ball.
Write your information down on a handmade ball band (a slip of paper will do), and put the yarn in a nice large ziploc bag. I'd also suggest keeping the sweater tags and putting those in the bag as well, as it will remind you what the fiber is made from, as well as how the fiber should be cared for (such as hand washed, dry clean only, etc.,)
That's it!
2 comments:
Brilliant! I never remember to do this! I'm still on the lookout for fat cashmere...everytime I find cashmere its like smaller than fingering weight lol
Would that I had looked this up before starting. I had the EXACT sweater that you warned against save for the fact that it is gorgeous wool. It's a total fail. I'm just going to full it and make something out of it's shrunken body.
Thanks for the great tutorial, though! :)
Post a Comment